2. Creating the Order
Part 2 of 8: Getting Started with TransMaS
This article is part of a series designed to take new users through the full lifecycle of an order.
In this article: We cover the manual order entry process, explore alternative ways to get data into the system (like APIs and Customer Portals), and explain how to search for or cancel existing orders.

The lifecycle of every shipment begins with the Order. This record stores all the core details—who is being billed, where the goods are going, and what is being moved. Every order starts with a status of New.
2.1 How to Create a Standard Order
Manual entry is the most common way to get work into the system. While there are many optional fields available, follow these steps to create a standard order:
-
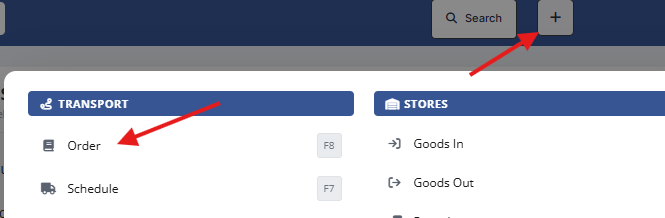
Open the Entry Screen: Press F8 (the fastest way from any screen) or click + Create > Order.
- Select Customer: Choose the billing client. This pulls in their default settings.
- Tip: Press F2 inside the customer or location boxes for an advanced search.
- Order Type: Such as bulk or general. You can define order types in Settings > Orders.
- Enter Consignment Details (C & D): Enter the Location, Date, and Time for both the collection and the delivery.
- Add Product & Rate: Select the Cargo Name, enter the Quantity, and confirm the Consignment Rate.
-
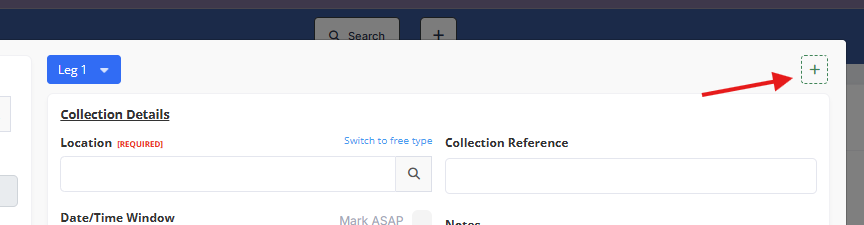
Multi-Leg Jobs: If the order involves multiple stops or legs, click the + icon in the top right. This adds a new consignment (leg) to the same order.
- Create: Click Create Order (bottom right) to generate the unique sequential order number and save the job to the system.


Looking for more detail? While this guide covers the essential steps for a standard order, our main Creating an Order article provides a comprehensive breakdown of every available field and setting.
2.2 Other Ways to Create Orders
Orders don’t always require manual entry. Depending on your setup, jobs can enter the system via:
- Customer Portal: Customers can request orders directly for approval.
- Spreadsheet Imports & APIs: High-volume data can be imported or pushed directly from third-party software. (Contact the support team if you are interested in this.)
- Interaccount Orders: Seamlessly move jobs between different TransMaS accounts.
2.3 Contract Orders
For bulk hauliers moving large volumes, use Contract Orders. Instead of separate orders for every trip, you set up a "Master Order" for a total tonnage and draw down individual loads as they are completed.
2.4 Finding, Editing, and Cancelling Orders
Once orders are in the system, you can find, update, or remove them as needed.
- How to find your work: If you have a specific order number or reference, use the Quick Search at the top of the screen for instant access. For more complex searches, go to Order Search (under Orders in the sidebar) to access an extensive array of search filters such as date, customer, or status.
- Learn more: Using Order Search
- Edit: From the search results, you can open an order to update details, add internal notes, or duplicate a previous job to save time.
- Cancelling: If a job is no longer required, open the order and click the red Cancel button in the lower left to cancel the order.
Next Step: With your orders created, they now need to be assigned to your fleet. Continue to Part 3: Planning (The Scheduler)