How to Create a Return
A return is usually used when a driver arrives at a delivery point and then needs to take the consignment elsewhere. Creating a return provides a quick way to generate a new consignment for the return journey, automatically using the original delivery location as the new starting point.
If you need to cancel the job entirely, see our How to Cancel an Order article.
Before You Begin
- Returns can only be created for jobs that are incomplete.
- If a job is already marked as complete, you will need to un-complete it first. To do this, open the job and click the Un-Complete Order button in the bottom-left corner of the screen.
- It is not possible to create a return for an job that has been invoiced.
Steps to Create a Return
- Navigate to the Open Orders screen. You can get there by selecting Orders > Open Orders from the side menu. Alternatively, you can search for a specific job by going to Orders > Order Search.
- Open the job you need to create a return for.
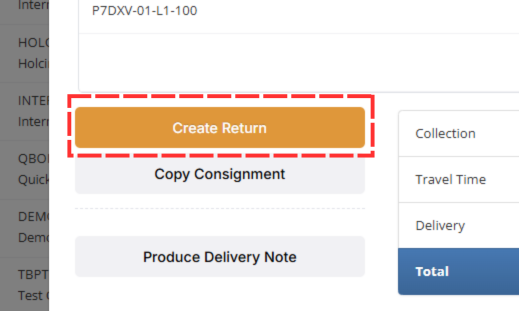
-
Click the yellow Create Return button, located under the product details.
- A pop-up window titled "Add Return to Order" will appear.
- The collection and delivery locations for the new consignment will automatically be switched.
- Product information, as well as collection and delivery notes, will be copied over from the original job. You can edit these details if needed.
- The text "RETURN" will be added to the collection and delivery reference fields. If there were existing references in these fields, they will be replaced.
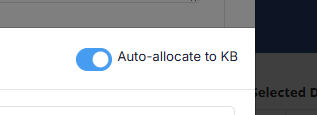
-
If the original consignment was scheduled, a toggle will appear in the top-right of the pop-up asking if you want to allocate the return to the same driver. By default, this option is turned on.
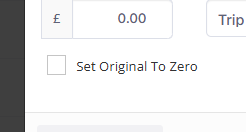
- The consignment rate defaults to £0. You can update this as needed.
-
A tick box option will also be available to set the original job's consignment rate to zero. This is not ticked by default.
- Click the Save button in the bottom right. The new consignment will then exist as an additional leg on the same job.


Next Steps
- Schedule the Return Leg: If you didn't use the "Allocate to same driver" toggle, you will need to do this manually. For more details on scheduling, see our article about Planning in the Scheduler.
- Confirm the New Schedule: If you have allocated it to a driver, the schedule will still need to be confirmed before the driver can see it in their app. Read about it in our Schedule Confirmation article.