Managing a Stock Item
Stock is received and tracked in discrete Stock Items (often representing a pallet or other container). Each stock item holds a specific quantity of units and is tracked with its own unique item number, QR code, location, and movement history. This article explains how to view, move, and print labels for stock items.
Before managing individual items, it is important to understand the difference between the Stock Product, a Stock Item, and the Units inside the item.
- Stock Product: This is the general definition of what the inventory is. It contains the product code, name, and default settings.
- Stock Item: This is the physical, trackable item currently sitting in your warehouse (the "Container"). It has a specific location, a unique QR code, and batch number.
- Example: A specific box or pallet of product received on Tuesday is the Stock Item.
- Units of Stock: The quantity of product held inside that Stock Item. This might be weight of a bulk product in a container, or the number of widgets on a pallet. If you're dealing with large equipment, the item may contain only 1 unit.
Opening a Stock Item
You can access a stock item in several ways:
-
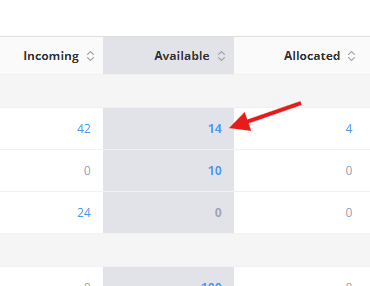
From the Live Stock drilldown — Click the Available quantity for a product; this opens a list of all individual Stock Items (containers) that make up that total.
- From an order — On a Goods In or Goods Out order, click on a received or allocated item.
- By scanning its QR code — Each item has a unique QR code that links directly to its detail view.

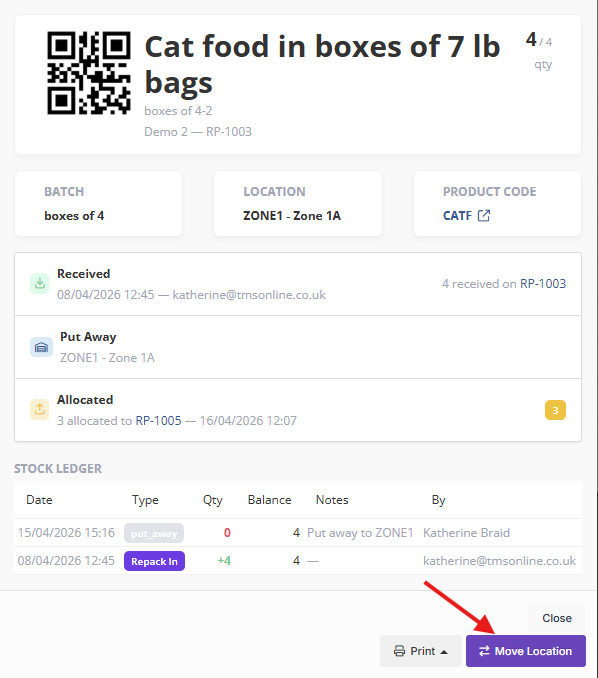
The Item Detail View
The item view shows everything about a single stock item:
Summary
- Item Number — The unique identifier (e.g. GI-12345-001).
- Product — The stock product this item belongs to, with a link to the product settings.
- Customer — The customer this stock belongs to.
- Current Quantity — How many units remain in this item.
- Batch Reference — The batch or delivery reference from receiving.
- Location — The zone where the item is stored, or "Unassigned" if not yet put away.
- QR Code — The item's scannable QR code.
Timeline
Shows the item's key events:
- Received — When it was received, by whom, the original quantity, and a link to the Goods In order.
- Put Away — The zone it was placed in (if applicable).
- Restrictions — Any quantities locked because this item is a source for a repack operation.
- Allocations — Quantities allocated to Goods Out orders, with Pending or Dispatched badges.
Stock Ledger
A complete audit trail of every movement for this item, including:
- Date and time
- Movement type (Goods In, Put Away, Transfer, Goods Out, Adjustment, Reversal, Repack)
- Quantity and running balance
- Notes and who performed the action
Moving an Item to a Different Zone
If stock needs to be relocated within your warehouse — for example, moving a pallet from a receiving area to a storage zone — you can move it from the item detail view:
- Open the stock item.
-
Click the Move button (or Put Away if the item hasn't been assigned a location yet).
- In the modal, select the new zone from the dropdown.
- Click Save.

The system records two stock ledger entries for a move: a Transfer Out from the old zone and a Transfer In to the new zone. The item's location is updated immediately.
Items with zero quantity cannot be moved — the Move button is disabled for fully consumed items.
Printing Item Labels
Each stock item can have a label printed — useful for physical identification, scanning, and warehouse organisation.
Print as PDF
- Open the stock item.
- Click the Print dropdown button.
- Select Download PDF.
- A PDF label will open in your browser, ready to print.
The label includes the item number, product code, product name, batch reference, quantity, and a scannable QR code.
Print via PrintNode
If your site has automated label printing set up via PrintNode:
- Open the stock item.
- Click the Print dropdown button.
- Select the printer you want to use from the list.
- The label is sent directly to the printer.
For details on setting up automated printing, see Setting Up Automated Label Printing.
Tips
- Use the QR code on the item label with the warehouse mobile app — scanning it opens the item directly, making put away and picking faster.
- The stock ledger is your audit trail — if you need to understand why a quantity changed, check the ledger for the full history.
- When an item shows Partially Allocated or Fully Allocated in the timeline, some or all of its quantity is committed to outbound orders.
- If you need to correct a quantity, use a stock adjustment rather than trying to work around it through orders.